September 14, 2026
Veneers for Kitchen Cabinets: What to Know

You're standing in an Austin-area kitchen with solid cabinet boxes, dated doors, and a finish that has seen years of cooking, cleaning, and Texas humidity. The layout mostly works, but a full tear-out sounds disruptive, expensive, and unnecessary. That's where veneers for kitchen cabinets can make sense, provided the underlying cabinets are sound and the surface treatment matches the way your household uses the room.
Veneer refacing is not a magic repair. It changes the visible surfaces while preserving much of the existing structure, so it can deliver a major visual improvement without solving poor storage, awkward work zones, water-damaged boxes, or a layout that never worked well. In Central Texas, the decision also depends on moisture control, substrate quality, edge protection, and installation discipline.
Table of Contents
- The Appeal of Veneers for Kitchen Cabinets
- Understanding Veneer Thickness and Substrates
- Navigating Central Texas Humidity and Climate
- When Refacing Stops Being the Smart Choice
- Modern Design Trends and Veneer Durability
- Professional Installation and Refinishing Limits
- Planning Your Austin Metro Kitchen Restoration
The Appeal of Veneers for Kitchen Cabinets
A homeowner in Round Rock may have cabinets that are square, sturdy, and perfectly usable, but doors with an outdated orange stain and exposed frames covered in scratches. A homeowner in Lakeway may want a warmer natural-wood look without removing countertops or living through a prolonged demolition. In both situations, veneer refacing offers a middle path. New doors and drawer fronts can change the style, while thin veneer covers the visible cabinet frames and sides.
Veneer is a surface material, not a replacement cabinet box. That distinction keeps expectations realistic. A professional can update the color, grain direction, door style, hardware, and visible finish, but the existing layout remains largely where it is. If the sink is too far from the preparation area or the drawers are too shallow for your cookware, a beautiful veneer won't correct those functional problems.
The appeal comes from the relationship between appearance and material efficiency. Real wood veneer uses a thin layer of desirable wood over a stable panel, creating the visual character of hardwood without building every cabinet component from thick solid lumber. Walnut can bring deep contrast, rift white oak can provide a clean linear grain, maple offers a light and uniform surface, and cherry brings warmer traditional character. The right choice depends on the architecture of the home, the door design, and the finish system, not just a sample viewed under showroom lighting.
From luxury craft to everyday cabinetry
Wood veneer has a documented history reaching back to ancient Egypt, where thin layers of expensive wood were applied over less costly substrates. The practice later appeared in the Roman Empire and during the Renaissance, then expanded during the Industrial Revolution as machinery made veneer production more accessible. A historical overview of American kitchen design notes that a 1958 Sears kitchen book featured wood veneers as part of the modern look, and that veneer became an enduring postwar kitchen trend by the late 1950s and early 1960s.
That history explains why veneer still feels both refined and familiar. It began as a way to extend scarce, expensive wood, then became a practical cabinet finish for homeowners who wanted a hardwood appearance at a lower material cost.
The broader market remains substantial. One industry report projects the global veneer sheets market from USD 25.91 billion in 2025 to USD 39.94 billion by 2035, at a projected 4.46% compound annual growth rate, while its U.S. estimates rise from USD 4.51 billion in 2025 to USD 5.90 billion by 2035. Those are market projections, not a promise about an individual cabinet project, but they show that veneer belongs to a large engineered-wood ecosystem serving furniture, interiors, doors, windows, flooring, residential work, and commercial applications. The veneer market report provides that broader context.
Understanding Veneer Thickness and Substrates
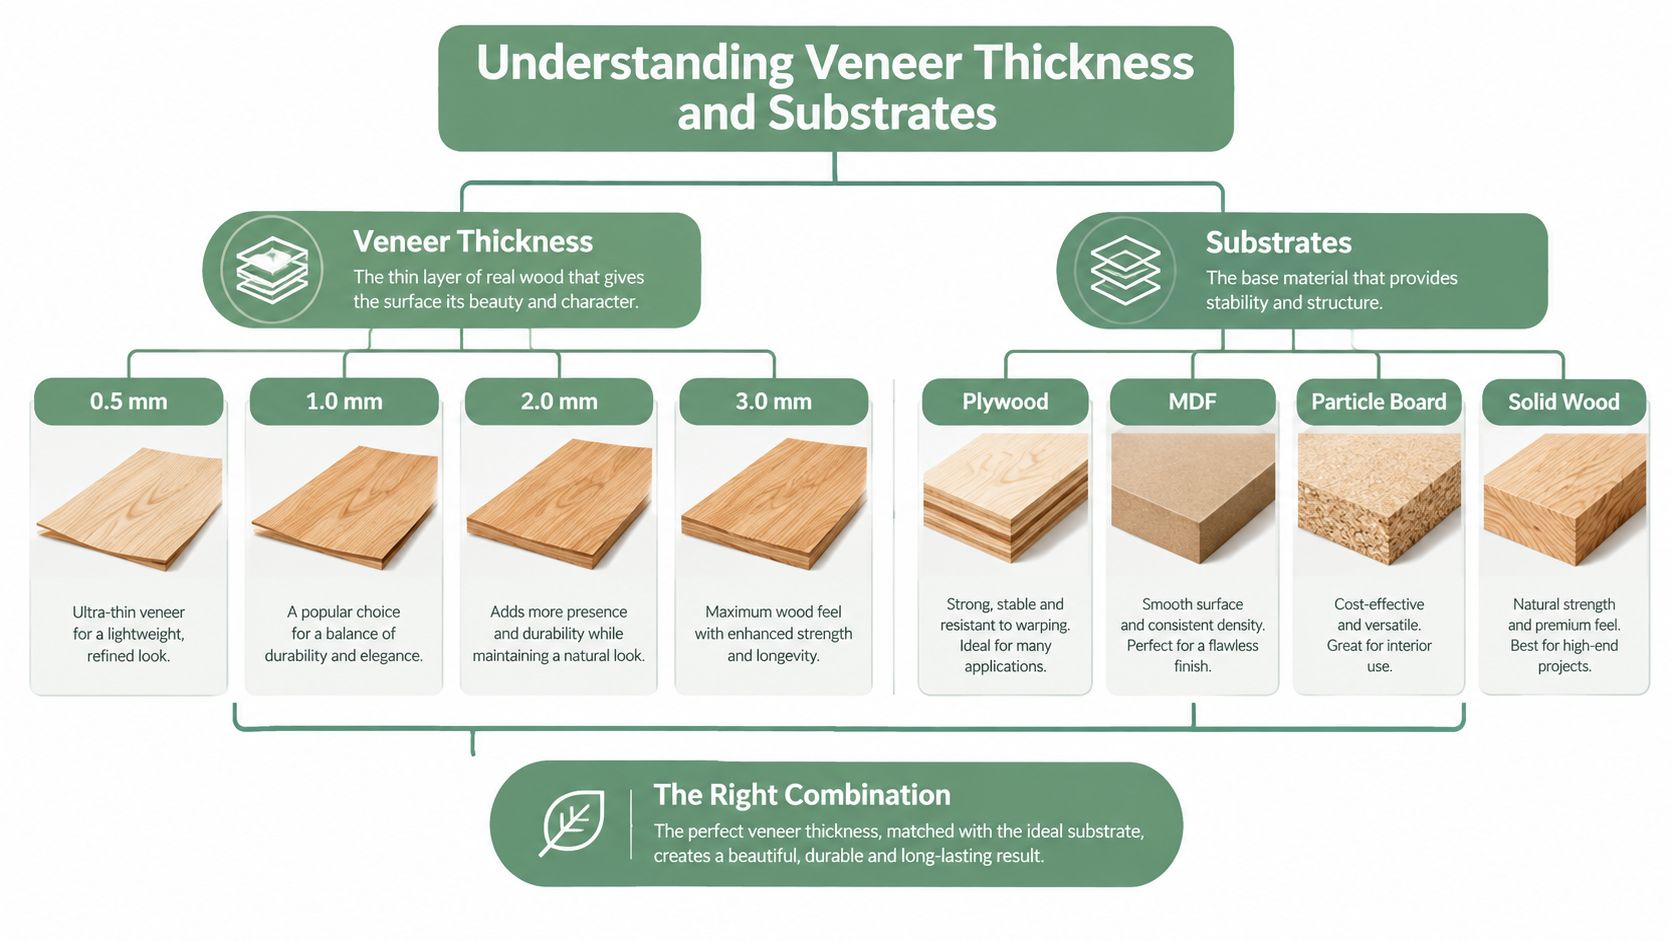
A cabinet veneer is more like a durable skin than a structural body. The skin supplies the grain and color, while the substrate beneath it supplies much of the flatness, stability, and resistance to movement. If the substrate is uneven, damp, contaminated, or poorly prepared, the finished veneer can reveal those defects instead of hiding them.
Architectural wood veneer on cabinet components is often about 1/40 to 1/32 inch thick, roughly 0.6 to 0.8 mm, when applied to hardwood plywood faces. Cabinet-grade plywood guidance explains that this thickness allows light sanding or refinishing while maintaining stability over the core. That sanding allowance is limited, though. It isn't comparable to a thick solid-wood door that can tolerate repeated aggressive resurfacing.
The face layer and the core
MDF is widely favored for veneering because its surface is smooth and uniform. That consistency gives the adhesive a more reliable contact area and reduces telegraphing, where seams, fibers, voids, or irregularities beneath the veneer become visible through the finished surface. For plywood cabinet components, B-B or B-C grades are commonly specified so the better face can point outward and the panel maintains a more consistent appearance and performance.
Refacing veneer can be even thinner than many homeowners expect. A cabinet-maker reference lists resin-backed veneer at 0.037 inch, or about 0.9 mm, showing that the process relies on a thin surface layer rather than a new cabinet box. The veneer and refacing reference is useful when reviewing a proposal because it makes the construction method clear.
What to ask before approving materials
Ask the installer to identify the veneer type, backer, substrate, adhesive, edge treatment, and finish. A proposal that says only “wood veneer cabinets” leaves out the components that determine whether the surface behaves well after installation.
- MDF: A uniform choice for flat panels and visible frames when moisture exposure is controlled.
- Plywood: A useful panel option when the specification, face grade, and edge treatment are appropriate.
- Backer material: Resin-backed veneer can help with handling and refacing applications, but it doesn't excuse poor surface preparation.
- Edge banding: Exposed edges need complete coverage and careful bonding because they receive frequent contact and can admit moisture.
- Finish: The topcoat must suit kitchen cleaning, heat, humidity, and ordinary movement.
The material list matters because veneer itself has very little room to compensate for a weak foundation. The best-looking sheet can still fail over a damaged box or an improperly cleaned surface.
Navigating Central Texas Humidity and Climate
Austin, Cedar Park, Leander, and Buda don't give wood a static environment. A local humidity reference records Austin's annual average humidity at about 83.5% at 6 a.m. and 48.9% at 3 p.m., illustrating a substantial daily moisture swing. The Austin humidity reference provides the figures. For cabinet work, the important point isn't just that the air feels humid. It's that wood, MDF, adhesive, and finish systems respond to changing moisture conditions at different rates.
A veneer sheet can gain or release moisture while the substrate responds differently. That mismatch creates stress at the glue line, seams, corners, and edges. If an installer applies veneer to material that hasn't adjusted to the work environment, the surface may look fine at first and later develop bubbles, lifted edges, open seams, or warping.
Moisture control starts before installation
Professional shops manage the material before glue ever touches the panel. MDF is typically kept around 8 ±3% moisture content, while veneer is generally around 8–12%, according to technical guidance on veneering MDF. Those conditions help reduce warping, bond stress, and seam failure in service.
Press conditions also matter. Common schedules for MDF, particleboard, and plywood use approximately 90–130°C, 1–5 minutes, and 0.8–1.5 MPa, or 115–220 PSI, as described in the same technical guidance. A field refacing project may use a different adhesive and application method, but the principle stays consistent. Pressure, temperature, time, substrate condition, and moisture content must work together.
Central Texas rule: Don't judge an installation by the first day. Ask how the contractor controls moisture before bonding and how the finish protects edges after installation.
DIY applications often fail because the homeowner focuses on the visible sheet and not the conditions beneath it. A dusty frame, grease residue, uneven paint, damp material, or insufficient pressure can create a bond that seems adequate until the kitchen cycles through heat, air conditioning, cooking steam, and storm-season moisture.
Finish selection matters as much as the veneer
The finish has to tolerate movement rather than forming a brittle shell that cracks when the wood shifts. Edges around sinks, dishwashers, and frequently handled doors deserve special attention because they face repeated contact and moisture exposure. A contractor working in West Lake Hills or Bee Cave should also account for strong sunlight near windows and exterior doors, not just indoor humidity.
For a practical overview of coating choices and moisture-aware care, see protecting finishes in Texas humidity. A localized approach won't make veneer waterproof, but it can reduce avoidable stress by matching preparation, adhesive, edge-banding, and topcoat decisions to the conditions the cabinets will face.
When Refacing Stops Being the Smart Choice
Refacing makes sense when the cabinet boxes are structurally sound and the layout already supports the way your household cooks. It stops making sense when the project is being used to disguise a functional problem. Veneer can cover a tired frame, but it can't move a wall, add meaningful storage, correct a bad work path, or repair a box that has lost its structural integrity.
Start with the boxes. Look for swelling near the sink, soft particleboard, delaminated plywood, loose joints, persistent water damage, and shelves that no longer sit securely. A new veneer over a compromised cabinet may create a clean appearance temporarily, but the underlying movement can transfer into the new surface.
Compare the actual choices
| Kitchen Condition | Best Approach | Why It Matters |
|---|---|---|
| Boxes are solid and level, and the layout works | Veneer refacing | Updates doors, drawer fronts, frames, and visible sides without replacing sound structure |
| Finish is worn, but the existing doors are worth keeping | Refinishing or restaining | Preserves more of the original cabinetry and focuses work on preparation and coating |
| Storage is inadequate or the work zones are awkward | Selective replacement or full remodel | Allows new cabinet sizes, inserts, drawers, and layout changes |
| Boxes are swollen, warped, or water-damaged | Cabinet replacement | A new surface cannot restore damaged structural material |
| The kitchen needs new lighting, countertops, and cabinet configuration | Coordinated remodel | Cabinetry, electrical planning, countertops, and workflow can be designed together |
The financial comparison deserves more nuance than “refacing always saves money.” National 2025 Cost vs Value-style data suggests a minor kitchen remodel can recoup about 113% nationally, according to industry guidance on when refacing is worthwhile. That figure isn't a guarantee of resale performance in Georgetown, Austin, or any specific home. It does show why a selective remodel can sometimes create more practical value than applying an attractive finish to a kitchen that still frustrates you every day.
The right middle ground may be selective replacement
A kitchen doesn't have to be an all-or-nothing decision. You may be able to retain sound cabinet runs, replace a damaged sink base, add a pantry cabinet, improve drawer storage, and reface the remaining visible surfaces. That approach preserves usable construction while directing money toward the parts that affect workflow.
For homeowners in Bee Cave or West Lake Hills, the key question is simple: Will the same layout still serve the household after the work is finished? If the answer is no, get a layout and storage assessment before approving veneer. A beautiful kitchen that still lacks landing space beside the range remains a frustrating kitchen.
Modern Design Trends and Veneer Durability
Natural wood is gaining attention again, but the design conversation can make veneer sound easier to live with than it is. A 2026 design survey reported 59% of professionals saying wood grain is overtaking painted cabinetry, with white oak the most requested species at 51%. The 2026 cabinet design survey supplies those figures.
Homeowner adoption tells a more cautious story. A 2025 Houzz kitchen trends study found 7% of renovating homeowners selected wood veneer, also noted in that source. The difference suggests that professionals may be moving toward natural grain faster than homeowners are willing to commit. Concerns about moisture, edge damage, visible wear, and future repairability are reasonable, particularly in a busy kitchen.
Why veneer still works visually
Veneer gives designers control over grain direction and continuity that can make a kitchen feel intentional. Rift white oak can support a restrained contemporary design, walnut can create contrast on an island, and maple can keep a smaller room visually light. The thin material also avoids the visual heaviness that some solid-wood constructions introduce.
The vulnerable points aren't usually the center of a properly finished panel. They're the exposed edges, corners, sink areas, dishwasher openings, and places where hardware repeatedly contacts the surface. Edge banding needs to be bonded tightly, trimmed cleanly, and sealed as part of the finish system. A topcoat that looks beautiful on a sample may not be the right choice if it scratches easily or becomes brittle under movement.
Match the finish to household behavior
A household that wipes spills quickly and uses cutting boards at the island presents a different maintenance environment from a household where wet towels hang against cabinet ends and steam accumulates around the dishwasher. Neither situation makes veneer automatically wrong, but each requires a different conversation about edge detailing and cleaning habits.
For Hutto, Pflugerville, and Kyle homeowners, I recommend judging samples under realistic light and handling them with the same expectations you have for the finished kitchen. Look at the grain, but also inspect the edge, sheen, and touch points. Satin and low-sheen finishes often make everyday fingerprints and minor wear less visually dominant than a highly reflective surface, though the exact coating still matters more than the label.
Natural wood veneer is trend-forward, but it isn't maintenance-free. Choose it because you accept its material character, not because a sample makes a promise about zero upkeep.
Professional Installation and Refinishing Limits
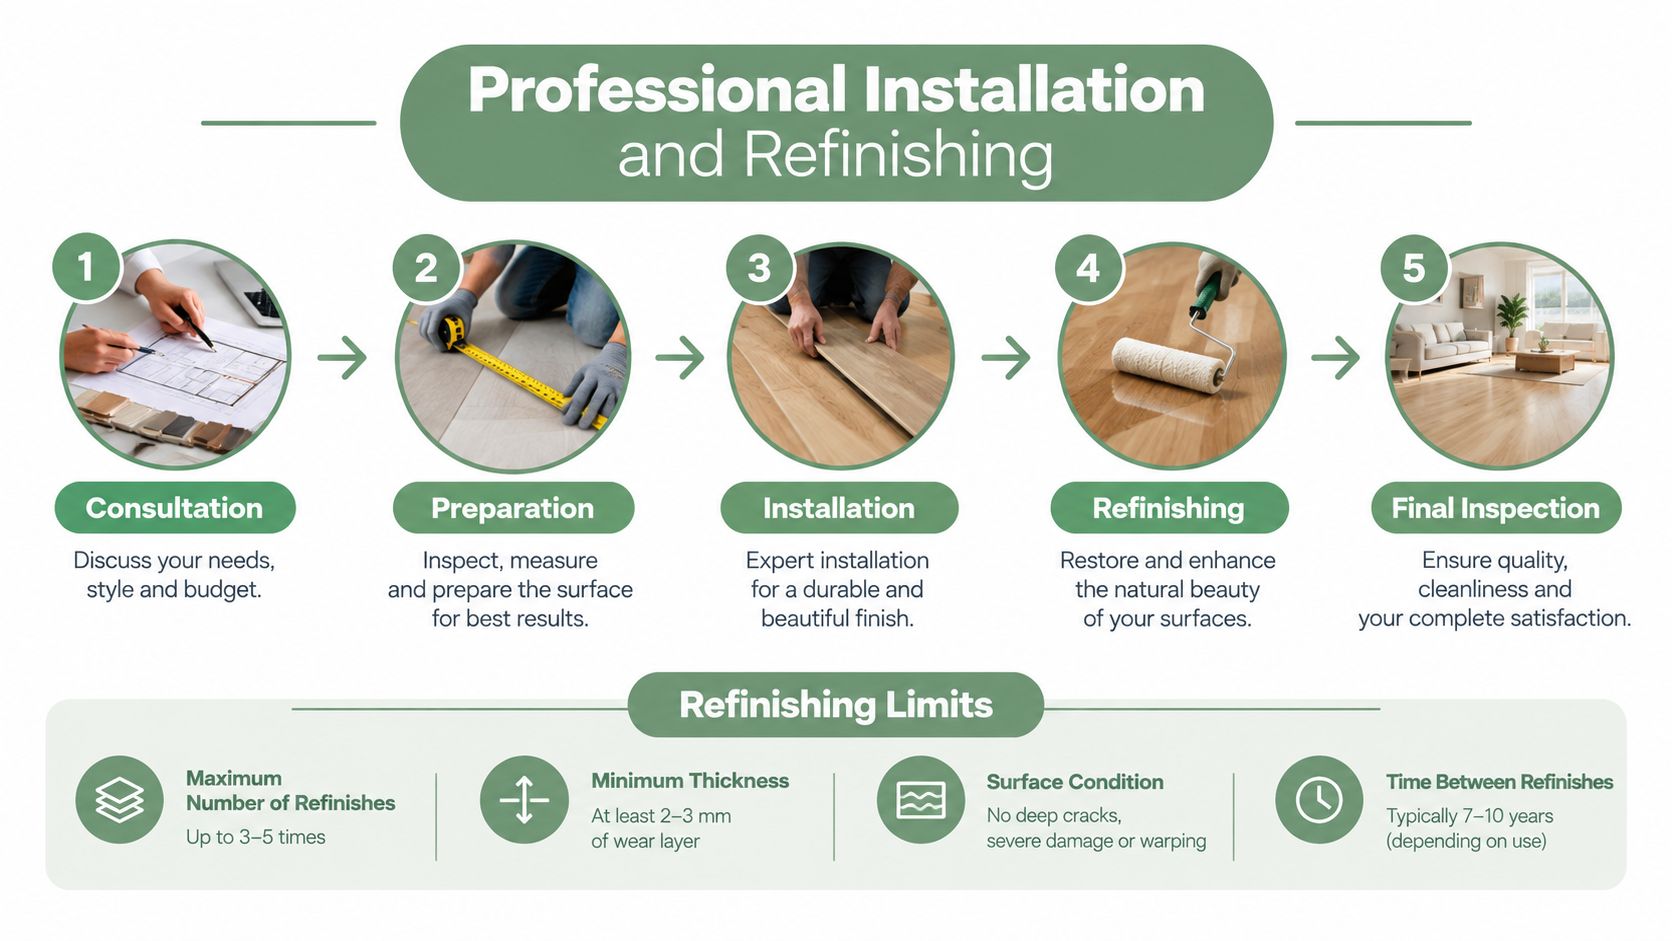
Good veneer work starts before the first cut. The substrate and veneer should acclimate for at least 48 hours before installation, according to a published veneer-installation guide. Acclimation gives both materials time to adjust to the installation environment, reducing the chance that they respond differently after bonding.
Surface preparation follows. Existing finish, grease, dust, loose fibers, and irregularities must be removed or corrected. The installer then measures each opening and plans grain direction, seams, corners, and edge coverage rather than treating the job as a series of unrelated patches.
A controlled application sequence
The centerline method is particularly useful on wide panels. Instead of starting at one edge and hoping the veneer settles evenly, the installer positions the material and works outward from the center. The same installation guide recommends scraping the bonded area firmly in the grain direction to secure adhesion. That mechanical pressure helps eliminate trapped air and improves contact across the surface.
A practical refacing guide recommends cutting veneer strips about 1/2 inch longer than the measured cabinet opening dimensions. It also specifies supplied edge banding at 7/8 inch wide, leaving extra material to cover inside edges. The cabinet refacing instructions provide those sizing details.
- Measure twice: Account for the actual opening, adjoining surfaces, grain direction, and trimming allowance.
- Bond from the center: Work outward so pressure distributes across the panel rather than trapping a pocket at one edge.
- Scrape with the grain: Use firm, controlled passes to support adhesion without damaging the veneer.
- Protect the edges: Trim and seal exposed areas carefully, especially around sinks and appliances.
- Respect cure time: Wait 24 hours before applying finishes to newly refaced cabinets and begin cleanup with 150-grit sandpaper, following the supplier's guidance in the same installation reference.
Refinishing has a finite limit
Veneer can usually tolerate light cleanup and limited refinishing, but its thin face layer sets a hard boundary. Aggressive sanding can cut through the decorative wood into the backer or substrate, expose a pale line, and create an uneven repair that shows under stain. A contractor shouldn't promise unlimited future restaining for a thin veneer surface.
That limitation is one reason I separate refacing, refinishing, and replacement during an initial inspection. Refacing usually introduces new visible material. Refinishing preserves an existing veneer or wood surface and depends on how much material remains after previous work. For specialized preparation, spray finishing, and restoration planning, cabinet refinishing services can be evaluated alongside refacing rather than treated as interchangeable processes.
Planning Your Austin Metro Kitchen Restoration
A useful decision starts with three inspections, not a color choice.
First, inspect the structure. Are the boxes dry, square, secure, and capable of carrying the doors and hardware you want? Second, inspect the function. Does the current arrangement support food preparation, cooking, cleanup, storage, and traffic? Third, inspect the environment. Will the cabinets face steam, sink splash, strong sunlight, or the humidity swings common around Austin?
If the boxes and layout work, veneer refacing can provide a substantial visual reset with less disruption than cabinet replacement. If the boxes are sound but the finish is the only problem, refinishing or restaining may preserve more of the original material. If storage, workflow, or structural condition is poor, spend the design effort on selective replacement or a full remodel instead of asking veneer to solve a problem it can't reach.
Build a line-item scope
A serious proposal should identify the doors, drawer fronts, veneer species, backer, substrate repairs, edge banding, adhesive process, finish system, hardware, protection of adjacent surfaces, and cleanup. It should also explain what remains unchanged. Generic pricing hides the decisions that control durability.
Homeowners in Austin, Round Rock, Leander, Cedar Park, Lakeway, Buda, West Lake Hills, Bee Cave, Georgetown, Hutto, Pflugerville, Kyle, Dripping Springs, Driftwood, and Steiner Ranch should choose a team familiar with local moisture conditions and the difference between cosmetic restoration and layout work. Planning a kitchen renovation can help organize those questions before contractors prepare competing scopes.
A non-demolition veneer project may be the right answer for a stable kitchen that needs a new face. A coordinated remodel may be the better investment when the room needs new storage, cabinet configuration, countertops, lighting, or custom millwork. The durable choice is the one that matches the cabinet's structure, the household's workflow, and Central Texas conditions.
Restore My Kitchen ATX provides cabinet refinishing, painting, restaining, veneer-related restoration, and full kitchen remodeling for Austin-area homes, with project scopes adapted to the existing cabinetry and layout. Visit Restore My Kitchen ATX to discuss whether your kitchen is a candidate for refacing, refinishing, selective replacement, or a complete remodel.