August 30, 2026
Knotty Pine Kitchen Cabinets: Refinish, Modernize, Love Them

You're standing in a kitchen that looked warm and welcoming when you moved in. Now the orange finish feels heavy, the knots dominate every photograph, and the room reads more like a cabin than a contemporary Hill Country home. The cabinets may still be solid, but you're stuck between painting, restaining, and replacing them entirely.
That decision deserves more than a quick recommendation to “paint everything white.” Knotty pine kitchen cabinets respond differently from maple, birch, or oak because pine is soft, resin-rich, and prone to movement. The right choice depends on how much knot character your doors show, whether the existing finish is sound, and how the coating will handle Central Texas heat, humidity, sunlight, and daily kitchen use.
Table of Contents
- A Pine Kitchen in Austin That Needed a Decision
- What Knotty Pine Actually Is and Why It Behaves Differently
- The Threshold Where Knotty Goes From Charming to Chaotic
- Paint, Restain, or Clear Coat
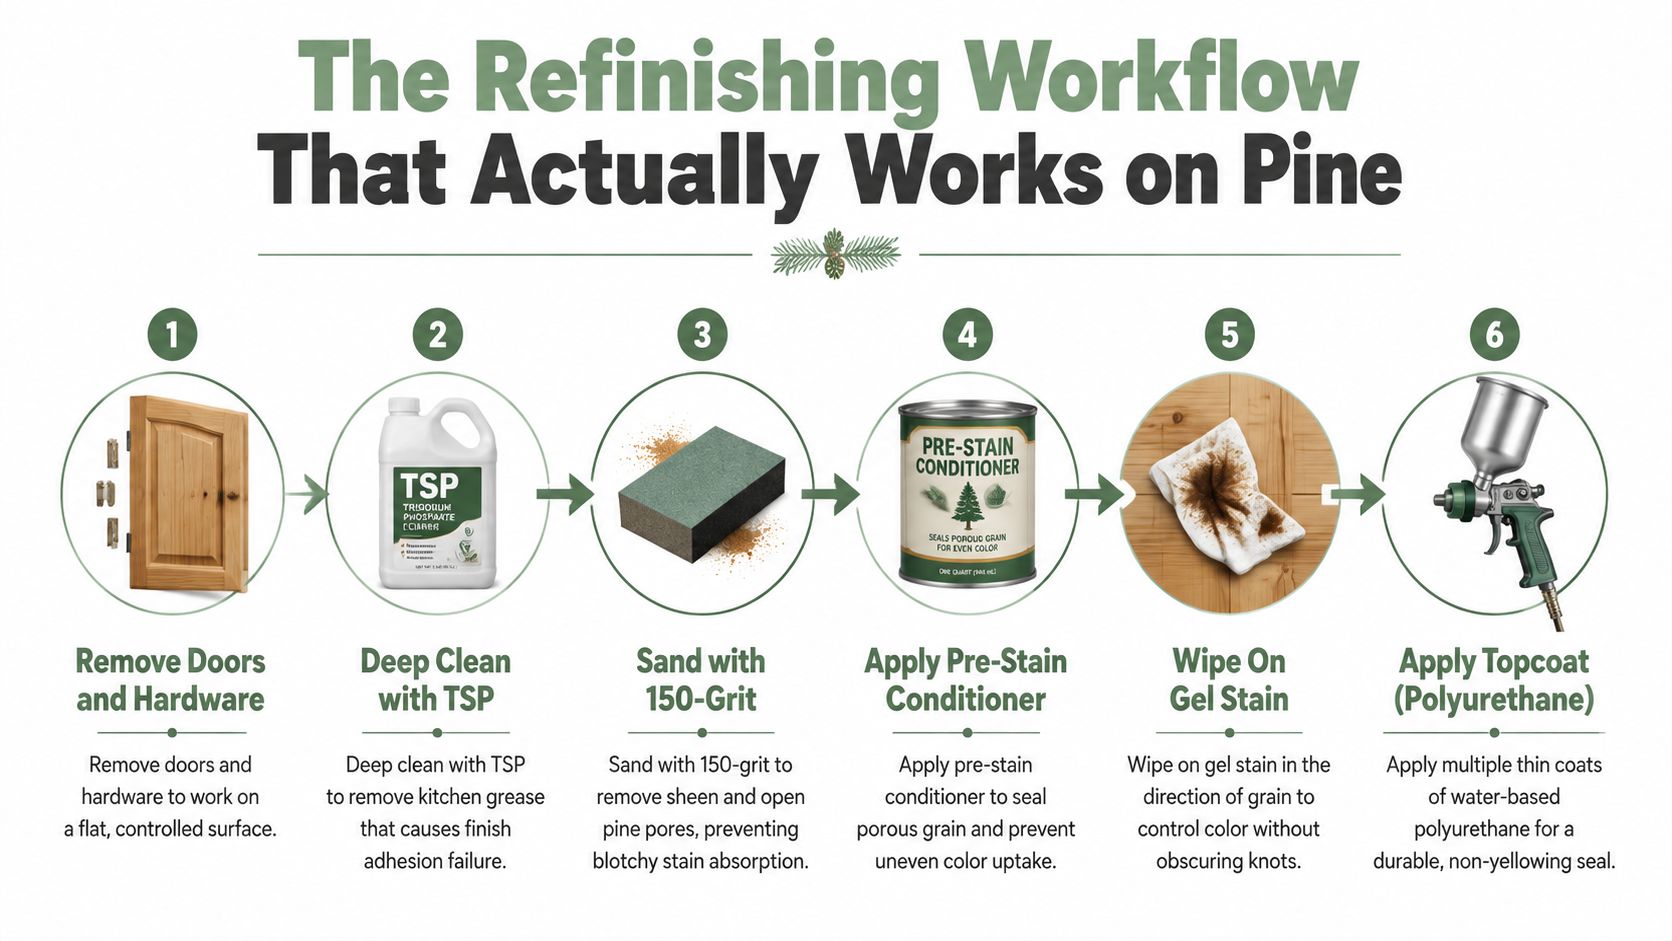
- The Refinishing Workflow That Actually Works on Pine
- Why Updating Beats Replacing in the Austin Metro
- Austin Climate and How It Shapes Your Finish Choice
- Myths Worth Retiring Before You Start
A Pine Kitchen in Austin That Needed a Decision
The kitchen was in a Round Rock home with original 1990s knotty pine cabinets. The homeowner, a teacher who had chosen the house for its access to the local school district, liked the warmth of the wood. She didn't like what happened whenever someone took a photo. The orange finish and busy knot pattern made the kitchen look enclosed and overly rustic, even though the adjoining family room was light, modern, and comfortable.
She had three estimates on the counter. One covered a full demolition and replacement with shaker-style boxes. Another proposed removing the doors, repairing the surfaces, and applying a professional spray finish over the existing cabinetry. The third was a DIY paint plan from a neighbor who insisted the job was easy.
The replacement quote promised a clean visual reset, but it also meant losing a usable layout and coordinating new cabinetry with countertops, plumbing, and electrical work. The professional refinishing quote kept the existing footprint and focused on surface preparation, knot sealing, priming, and a controlled topcoat. The DIY option looked attractive until the homeowner asked what would happen to the resinous knots beneath a white finish.
The hesitation wasn't really about white paint. It was about whether the wood would cooperate with the finish.
That concern is justified. Pine knots can continue pushing resin and discoloration through paint unless the finisher cleans and seals them properly with a shellac-based primer or dedicated knot sealer, as described in this professional guidance for painting knotty pine cabinets.
The turning point came when we stopped discussing trends and looked closely at the doors. Some had one tight knot that added character. Others had several loose knots, dark rings, and visible checks clustered across the center panel. The cabinets weren't automatically the problem. The finish, the knot density, and the way those knots were distributed across each door mattered more than the age of the kitchen.
That same question applies in Austin, Leander, Cedar Park, Lakeway, Buda, West Lake Hills, Bee Cave, Georgetown, Hutto, Pflugerville, Kyle, Dripping Springs, Driftwood, and Steiner Ranch. Before choosing a finish, determine whether your pine looks intentionally organic or visually chaotic.
What Knotty Pine Actually Is and Why It Behaves Differently
Knotty pine isn't ordinary pine with random marks added for decoration. The knots are embedded branch cores, and their density, resin content, and absorption differ from the surrounding wood. That difference is why the same coating can look even on the clear grain and unpredictable over a knot.
Pine also has a softer earlywood and denser latewood. The porous bands absorb stain quickly, while the harder bands absorb less. A finish that behaves evenly on maple or birch can soak into pine unevenly, leaving darker or lighter bands around the knots and across the grain.
Scots pine is listed at approximately 500 to 540 kilograms per cubic meter at 12% moisture, with a volumetric contraction coefficient of 0.38%, according to this Scots pine wood reference. Those properties help explain why pine cabinets can dent more easily than many hardwood cabinet woods and why the finish needs to tolerate dimensional movement.
Resin changes the finishing sequence
Knots are resin-rich. Oil-based stains may darken them sharply, water-based products can raise the grain around them, and clear finishes may amber more noticeably over resin pockets. The problem isn't that pine can't be finished. The problem is that pine requires the finish system to acknowledge what the wood is doing.
A quick wipe-on stain test makes the difference obvious. On a hardwood door, you may have enough working time to spread and even out the color. Pine can absorb the product rapidly into its earlywood, leaving little time to correct a heavy area before it turns muddy.
That's why conditioner, gel stain, controlled wiping, or an opaque coating often produces a more predictable result than a thin penetrating stain applied directly to raw pine. The finish needs to regulate absorption rather than cover the surface.
Knots are a design feature and a coating risk
A knot can add warmth when it's tight, stable, and balanced by quieter grain nearby. The same knot becomes a problem when the surrounding finish is failing, the ring is bleeding through, or multiple knots compete on one small door face.
Your choice of paint, stain, or clear coat should start with that behavior. Design preference comes second, because a beautiful color won't rescue a coating system that ignores resin and movement.
The Threshold Where Knotty Goes From Charming to Chaotic
The most useful way to judge knotty pine cabinet fronts is to evaluate visual concentration, not just whether knots exist. A 2023 study of pine furniture fronts found that visual attractiveness dropped significantly as knot count increased from zero to four, while adding more knots beyond that did not significantly change ratings. Knot count alone explained 61% to 87% of attractiveness classification, depending on the model, as reported in the study indexed by the U.S. Forest Service.
That research doesn't provide a universal rule for every kitchen door. Cabinet fronts are smaller, viewed more closely, and repeated across an entire run. Still, it gives homeowners a better framework than vague advice that knotty pine is either charming or dated.
Read the door, not the room
A single tight knot near a hinge can look like deliberate character. Four loose knots across the center panel, especially when one has a visible check or dark resin ring, can read as damage. Repetition makes the issue stronger. If every door has a different pattern, the eye may struggle to find a quiet visual rhythm.
Use this simple inspection:
- Photograph one door straight on: Use morning light rather than a dramatic evening angle, and avoid a wide-angle lens that distorts the panel.
- Count the visible knots: Focus on knots larger than approximately 5 millimeters, and note whether they sit near edges, rails, or the main center panel.
- Look for resin evidence: Amber rings, glossy centers, or dark halos suggest that the finish may fight the wood unless the knots receive targeted sealing.
- Review the full run: A door that looks attractive alone may become overwhelming when repeated across a long wall of cabinetry.
The study's results are most useful as a decision aid. They show that knot quantity influences perceived quality, but they don't establish a precise percentage of surface area where every cabinet becomes unattractive. I'd avoid treating any exact visual cutoff as a law. Your lighting, door size, stain color, hardware, backsplash, and surrounding wood all affect the result.
If the knots are the first thing you see in every door, choose a finish that controls them rather than pretending they won't matter.
Clients who want to preserve the pine should embrace its pattern with a toned stain or clear finish. Clients who love the layout but dislike the visual noise should consider paint. If the doors contain unstable knots, widespread checks, or a pattern the homeowner never liked, replacement fronts may make more sense than forcing an imperfect surface to behave like new millwork.
Paint, Restain, or Clear Coat
There are three legitimate finish paths for knotty pine cabinets. Each creates a different balance between character, color control, preparation, and maintenance.
A practical comparison
| Factor | Paint | Restain | Clear Coat |
|---|---|---|---|
| What it preserves | Hides most knot and grain variation | Preserves visible grain and some knot identity | Preserves the existing color and wood pattern |
| Preparation | Degreasing, scuff-sanding, knot sealing, bonding primer | Finish removal or heavy sanding, conditioning, stain, protective topcoat | Cleaning, degreasing, scuff-sanding, adhesion check, compatible clear finish |
| Best for | Orange tones, busy knot patterns, dramatic modernization | Homeowners who want warmer wood with a calmer tone | Sound existing finish where the color is acceptable |
| Primary failure | Peeling or bleed-through where knots weren't sealed | Blotchy absorption and uneven color | Locking in yellowing or an outdated amber tone |
| Visual result | Smooth and controlled, but less rustic | Updated wood character with variation | Maximum existing character and the least color change |
Paint gives the most control
Paint is the strongest option when the knot pattern dominates the kitchen or the orange tone conflicts with the rest of the home. It can create a quiet surface that lets countertops, lighting, and hardware carry more of the design.
The sequence matters. Clean the knots, seal them with shellac-based primer or an equivalent knot-sealing system, prime the complete surface with a bonding primer, then apply a cabinet-grade enamel. If you skip the knot sealer, resin and discoloration can return through the new color. If you use ordinary wall latex, the coating may remain too soft for doors, drawer fronts, and repeated cleaning.
Restaining keeps the wood visible
Restaining works when the doors have attractive grain and a knot pattern you're willing to keep. The old varnish, shellac, or other topcoat usually needs to be removed or sanded away because it can block adhesion and prevent the new stain from absorbing evenly. A detailed knotty pine cabinet refinishing guide recommends sanding until the finish is gone, removing dust, using conditioner before stain, and allowing each varnish coat about 24 hours to dry.
Neutral, gray-toned, or lightly toned stains can reduce the orange cast. Conditioner helps moderate the difference between porous earlywood and denser latewood, but it won't make every door identical. That variation is part of the appeal, and also part of the trade-off.
Clear coating is the least transformative path
A clear coat makes sense when the existing stain is stable and you already like the color. Clean, degrease, scuff-sand, and apply a compatible waterborne acrylic or alkyd clear finish. This path preserves the most character and usually requires less color work, but it also preserves the existing orange tone, wear, and unevenness.
A clear finish can't make dated color disappear. It locks in what's already there, so test it on an inconspicuous area before committing to every door.
The Refinishing Workflow That Actually Works on Pine
A reliable pine refinishing job is controlled from the first removal step. Doors should come off the hinges, receive labels that correspond to their openings, and move to a flat or hanging setup where both faces and edges can be prepared consistently.
Start with a TSP substitute or an equivalent cabinet-safe degreaser. Years of aerosolized cooking oil settle on rails, stiles, edges, and the area around pulls. Paint won't bond to a greasy surface, no matter how expensive the topcoat is.
Preparation prevents predictable failures
Scuff-sand through the surface with care, working toward 220 grit where the existing finish and profile allow it. The goal is to remove sheen and create a mechanical tooth, not to erase the door profile. Break sharp edges lightly so the coating doesn't sit thin on the corners, but don't round over the rails and stiles.
Clean the dust thoroughly. Then seal every visible knot with two thin coats of dewaxed shellac, such as BIN or Zinsser SealCoat, cut 50% when appropriate for the product and application. This step is essential on resinous pine because it isolates the knot before primer and topcoat go on.
Build the finish in thin, compatible layers
Apply a bonding primer over the complete door and cabinet surface. For a factory-smooth painted result, cabinet-grade waterborne enamel can be applied with HVLP at approximately 4 to 6 mils wet. A homeowner working without spray equipment can use a high-density foam roller and carefully tip off the surface with a quality brush, though the texture and control won't match a controlled spray setup.
Lightly scuff between compatible coats, remove the dust, and respect the manufacturer's recoat instructions. The coating may feel dry before it has developed its working strength. Allow a 21-day full cure before heavy use, aggressive cleaning, or stacking freshly finished doors against one another.
New soft-close hinges can be worthwhile when the existing hardware is worn. A beautiful finish looks unfinished when sagging hinges scrape the edges or prevent doors from closing cleanly.
For homeowners comparing professional scopes, cabinet refinishing services from Restore My Kitchen ATX describe controlled preparation, spray application, and a factory-style process. The important question isn't only who applies the coating. Ask how the company handles grease, knot sealing, edge coverage, dust control, and cure time.
Why Updating Beats Replacing in the Austin Metro
Replacement makes sense when the boxes are damaged, the layout no longer works, or the kitchen needs a structural redesign. It's not automatically the right answer for solid cabinetry with a layout the homeowner already likes.
In the Austin metro, a standard mid-range full cabinet replacement typically runs $18,000 to $45,000, with two to four months of lead time for shop-built boxes plus another month on site for demolition, plumbing, electrical work, and countertop templating, according to the provided Austin-area project guidance. A professional refinish of the same cabinetry typically falls between $4,500 and $9,000 and can finish in five to eight working days, with no countertop disruption and no need to vacate the kitchen.
Those figures are planning ranges, not promises. Door condition, cabinet size, repairs, color changes, hardware, access, and the number of finish coats all affect the estimate. Still, the comparison shows why refinishing deserves a serious look before demolition.
Keep the layout when the layout works
A 1980s West Lake Hills home provides a familiar example. The granite countertop was staying, the cabinet boxes were structurally useful, and the homeowner didn't want to change the location of the sink or appliances. Replacing everything would have created a larger project around a problem that was mostly visual. Refinishing allowed the existing layout to remain while a calmer finish changed the way the room connected to the rest of the house.
The material benefit matters too. Keeping existing cabinets in service avoids sending approximately 800 to 1,200 pounds of dimensional lumber and particleboard to a Travis County landfill, based on the provided project data. That isn't the only reason to refinish, but it's a practical consequence of choosing restoration over disposal.
Before comparing bids, review the planning considerations in this kitchen renovation planning guide. A good scope should identify what stays, what gets repaired, how the doors are finished, how the kitchen remains usable, and what the timeline includes.
Austin Climate and How It Shapes Your Finish Choice
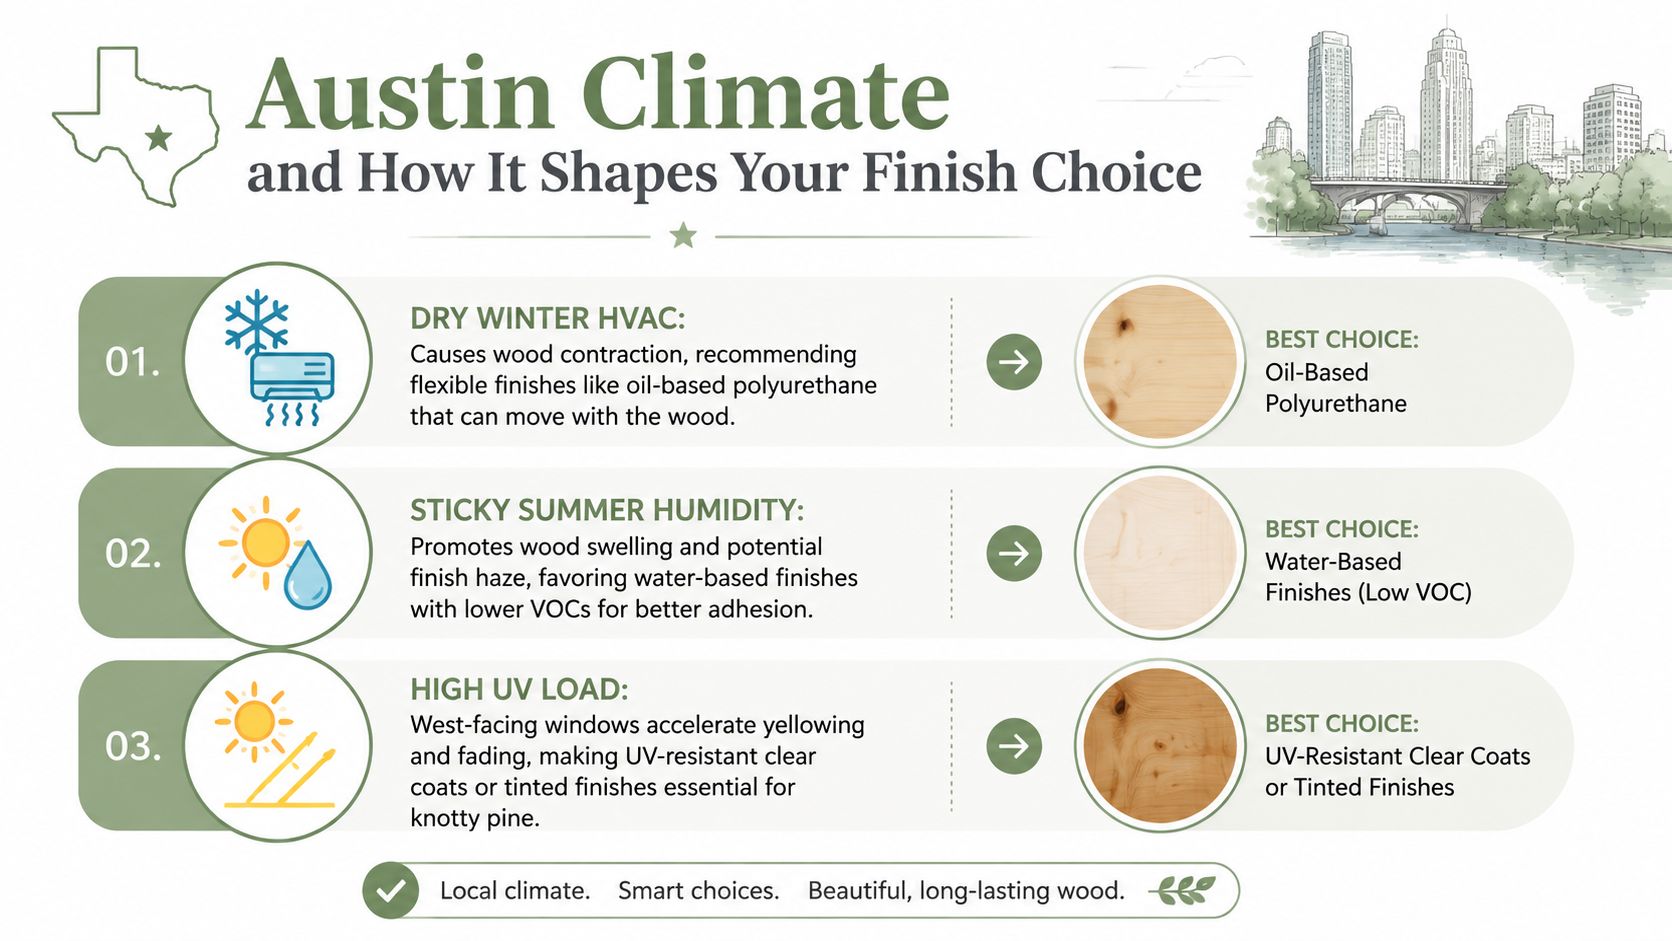
Central Texas gives cabinet finishes several things to manage at once. Winter HVAC operation can dry indoor air, summer weather brings sticky humidity, and west- or south-facing windows can put strong UV exposure on door fronts. The finish needs to move with the wood, resist household moisture, and remain visually stable in bright light.
For Austin homes, an indoor relative humidity range of 35% to 55% is recommended in this wood-flooring maintenance guidance for Austin's heat and humidity. Cabinets aren't floors, but the same indoor environment affects interior woodwork and finish movement. Keeping humidity reasonably controlled helps reduce unnecessary expansion and contraction.
Match the coating to the room
Waterborne acrylic systems generally preserve clarity better than oil-modified products, which can amber over time. Oil-modified polyurethane may offer a familiar application feel and can accommodate movement, but it changes the appearance of pale pine as it warms. Clear coats near west-facing windows deserve particular scrutiny because the window exposure can accelerate visible color change.
Application conditions also matter. Alkyd products and catalyzed conversion coatings can cure poorly in cold conditions below 60°F, while shellac is more tolerant of cooler shop environments. Don't assume a product that worked in a conditioned shop will perform the same way in an unheated garage.
A Central Texas care checklist
- Control indoor humidity: Keep the home within the recommended range instead of allowing large seasonal swings.
- Manage direct sunlight: Use shades or filtered window treatments on strong west-facing exposures.
- Clean gently: Use a soft cloth and a compatible cabinet cleaner rather than saturating seams and edges.
- Protect the cure: Don't load shelves, reinstall doors, or scrub new surfaces aggressively before the coating has cured.
- Watch vulnerable areas: Inspect sink bases, dishwasher-adjacent stiles, and lower door edges for moisture exposure.
For regional maintenance considerations, this guide to protecting finishes in Texas humidity is a useful companion to the finish selection itself.
Myths Worth Retiring Before You Start
Myth one, all knotty pine is dated. Some knotty pine kitchens do look trapped in a previous decade, especially when orange stain, dark hardware, and heavy wood tones repeat across the room. A toned clear finish, a lighter stain, or restrained paint can shift the visual language while preserving the material.
Myth two, painted pine always looks cheap. Poor preparation makes painted pine look cheap. When the finisher degreases thoroughly, seals every knot, uses a suitable bonding primer, and applies a cabinet-grade enamel, the result can be smooth and intentional. Paint won't preserve the wood character, but that's often the point when the knot pattern feels too busy.
Myth three, restaining is a weekend project. Restaining may be manageable as a small furniture project, but a kitchen includes doors, drawer fronts, edges, cabinet boxes, hardware, dust, drying space, and repeated handling. Old topcoats need to come off or be properly abraded, conditioner must be used where appropriate, and each sealer, stain, and protective coat needs its own drying and cure schedule.
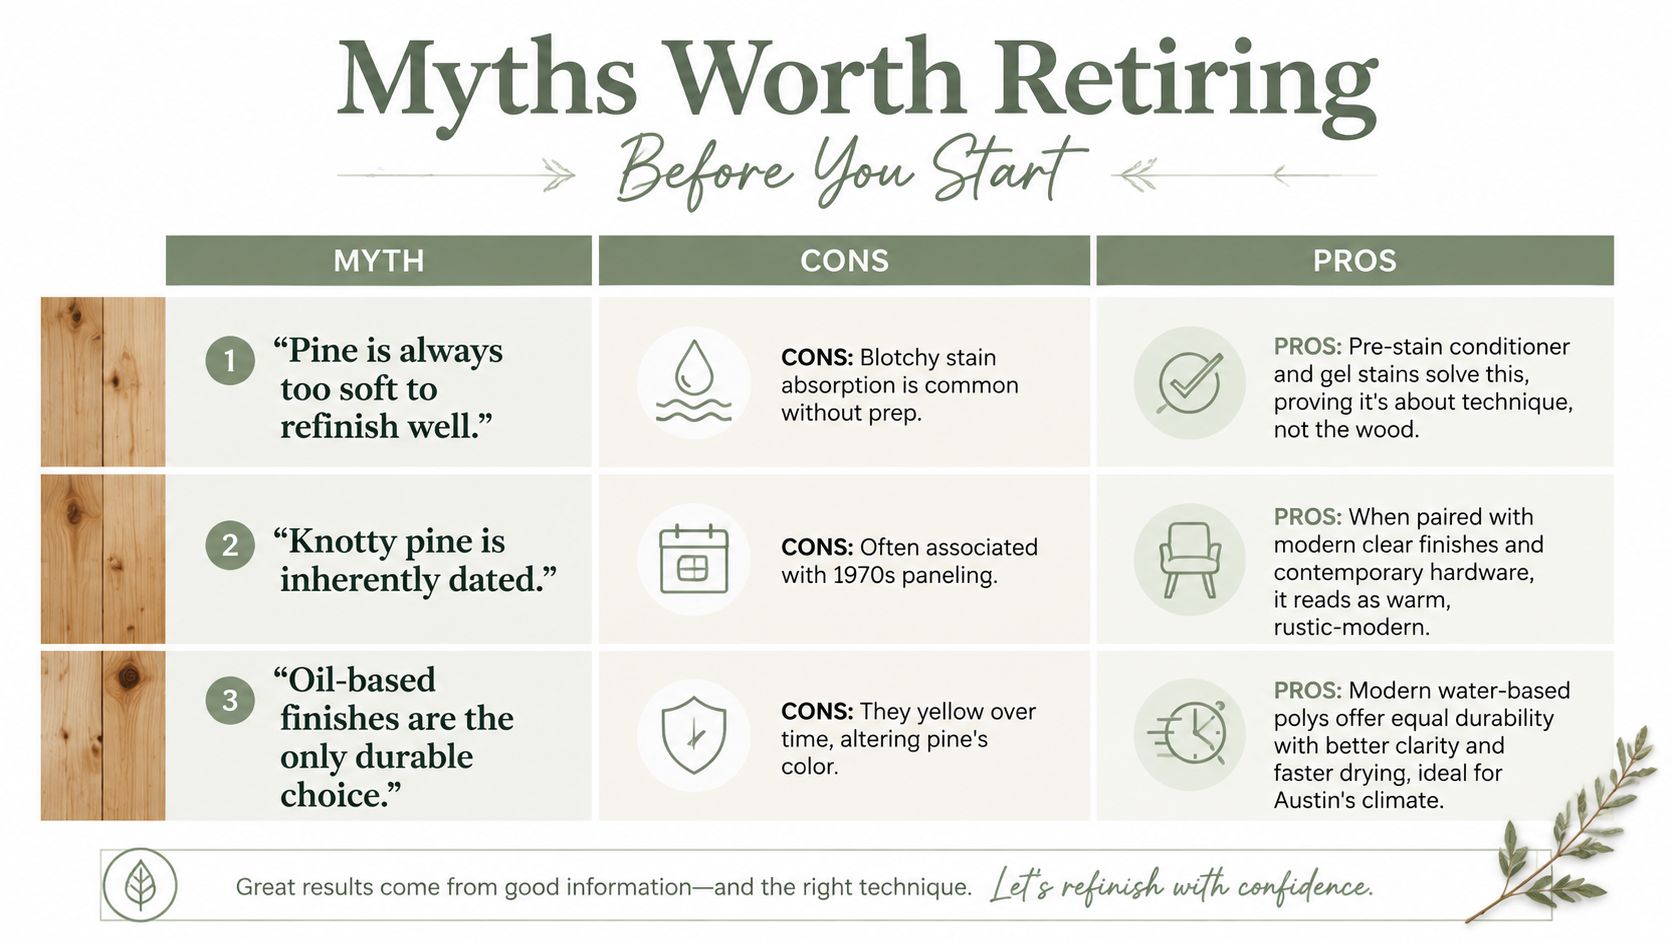
Myth four, sanding alone solves the problem. Sanding removes sheen and helps adhesion, but it doesn't isolate resin. A knot can remain chemically active beneath a beautifully sanded surface.
Myth five, knots don't need sealing under stain. A transparent stain can preserve knot identity, but resin still affects absorption and color. Test first, condition where suitable, and expect variation rather than a perfectly uniform field.
Myth six, any interior latex works on cabinets. Walls and cabinet doors experience different wear. Doors are handled, cleaned, bumped, and exposed to cooking moisture. Use a coating designed for cabinetry and follow its application and cure requirements.
The trade-off is simple: preserve more wood character and accept more variation, or choose more opacity and gain more control.
Restore My Kitchen ATX provides cabinet refinishing, painting, and restaining for homeowners across Austin and the surrounding metro, with preparation and spray-finish options suited to dated or resin-rich pine cabinetry. Visit Restore My Kitchen ATX to discuss your knot pattern, existing finish, preferred path, and a project-specific quote before you commit to paint, restain, or replacement.