September 15, 2026
Front Door Handle Repair How to Fix Loose Handles Fast
You're halfway out the door, coffee in hand, when the front lever droops instead of springing back. Or the latch refuses to retract, so you have to shoulder the door open. I've seen the same problem in homes from Austin and Round Rock to Cedar Park, Lakeway, and Buda. The visible symptom is small, but the failed part may be a screw, spindle, spring, latch, or strike alignment.
The fastest way to handle front door handle repair isn't to tighten everything and hope. Isolate the fault first, then make the smallest correction that restores smooth movement and secure latching. That approach prevents stripped screw holes, damaged trim, and repeated disassembly.
Table of Contents
- Why Your Front Door Handle Feels Loose or Stuck
- Diagnose the Actual Problem Before You Grab Tools
- How to Tighten and Stabilize a Loose Front Door Handle
- Fixing a Stuck Latch and Misaligned Strike Plate
- When Repair Makes Sense and When to Replace Hardware
- Keep Your Entry Hardware Working Longer in Central Texas
Why Your Front Door Handle Feels Loose or Stuck
A loose handle often appears suddenly. In a Leander home, a lever may wobble after years of family traffic. In Pflugerville, the handle may still look fine but spin without retracting the latch because the spindle no longer engages correctly. Georgetown and Hutto entries can show a different symptom, a handle that feels tight but won't return fully after the door has shifted slightly in its frame.
The underlying issue usually comes from use intensity rather than calendar age. Under EN 1906, handle durability is specified in operating cycles, with Grade 6 rated at 100,000 cycles and Grade 7 at 200,000 cycles according to industry guidance on cycle-tested door hardware. A busy entrance accumulates those movements much faster than a rarely used guest door, so a handle's condition depends on traffic, material, installation, and alignment.
Material changes the repair decision, too. The same source estimates a budget die-cast zinc handle at 5–15 years, 304-grade stainless steel at 30–50 years, and solid brass at 50–100 years in normal residential use. Those ranges aren't a promise for any individual home, but they explain why reconditioning a solid brass set can make sense while a worn low-cost mechanism may be better replaced.
Practical rule: A handle that's loose because of fasteners can often be stabilized. A handle that remains loose after the fasteners are secure usually has internal wear.
Central Texas conditions add stress to exterior assemblies and finishes. Austin has a humid subtropical climate with hot summers and mild winters, a pattern associated with UV exposure and repeated moisture cycling according to Austin climate information. Homes in West Lake Hills, Bee Cave, Steiner Ranch, and Dripping Springs may experience the same broad combination of sun, heat, and humidity, even when the hardware itself isn't visibly corroded.
The first useful question is simple: Does the handle move independently, or is the latch binding against the frame? That answer determines whether you need a screwdriver, a spindle inspection, a latch adjustment, or a replacement conversation.
Diagnose the Actual Problem Before You Grab Tools

A front door handle can feel loose, stiff, or unreliable for different reasons. Start with the door open. Testing it while closed can hide alignment trouble and may leave you locked out if the latch stops retracting.
Separate the handle from the latch
Operate the lever slowly while watching the latch bolt. If the lever moves but the latch barely retracts, inspect the spindle or internal handle mechanism. If the latch retracts fully while the handle rocks at the rose or backplate, the mounting fasteners are the better starting point.
Check underneath and along the handle for a small set screw, also called a grub screw. Some lever sets use a detent access hole instead. Pressing the detent with a small pick or straightened paper clip can release the lever from its mounting post. A correctly sized hex key loosens a set screw. Identify the retention method before prying against the finish.
Remove the interior rose or decorative trim carefully, keeping the screws together. Handlesets may use different screw lengths. With the trim off, inspect the spindle, the square bar that connects both sides through the latch. This separates a loose trim problem from wear inside the operating parts.
Check spindle wear and spring action
A rounded spindle can turn inside the handle without transferring enough movement to the latch. A spindle that is too short may barely engage the exterior handle, while the wrong length can keep the handle from seating correctly. Check for rounded corners, bending, looseness, and visible wear.
Operate the handle with the door open, then release it. A drooping lever or weak return usually indicates a worn spring cassette or internal mechanism, not a loose mounting screw. If the handle works freely with the trim removed but binds after reassembly, the trim or through-screws may be squeezing the carrier.
Identify alignment before blaming the handle
Push the door nearly closed and watch the latch meet the strike opening. Scraping, incomplete entry, or pressure required on the door indicates an alignment problem. Check the hinge side and frame position before ordering hardware, because replacing a sound handle will not correct a shifted strike.
For help assessing the assembly before removing more parts, you can contact Restore My Kitchen ATX.
Avoid flooding the latch with household oil. Oil-based products collect grit and can create a sticky abrasive paste. Graphite or a silicone-based lubricant is generally a better choice for the latch mechanism.
How to Tighten and Stabilize a Loose Front Door Handle
A loose front handle often needs more than tightening the screw you can see. Decorative roses and escutcheons hide the actual fasteners on many modern sets, especially the larger handlesets found in Lakeway and West Lake Hills remodels.
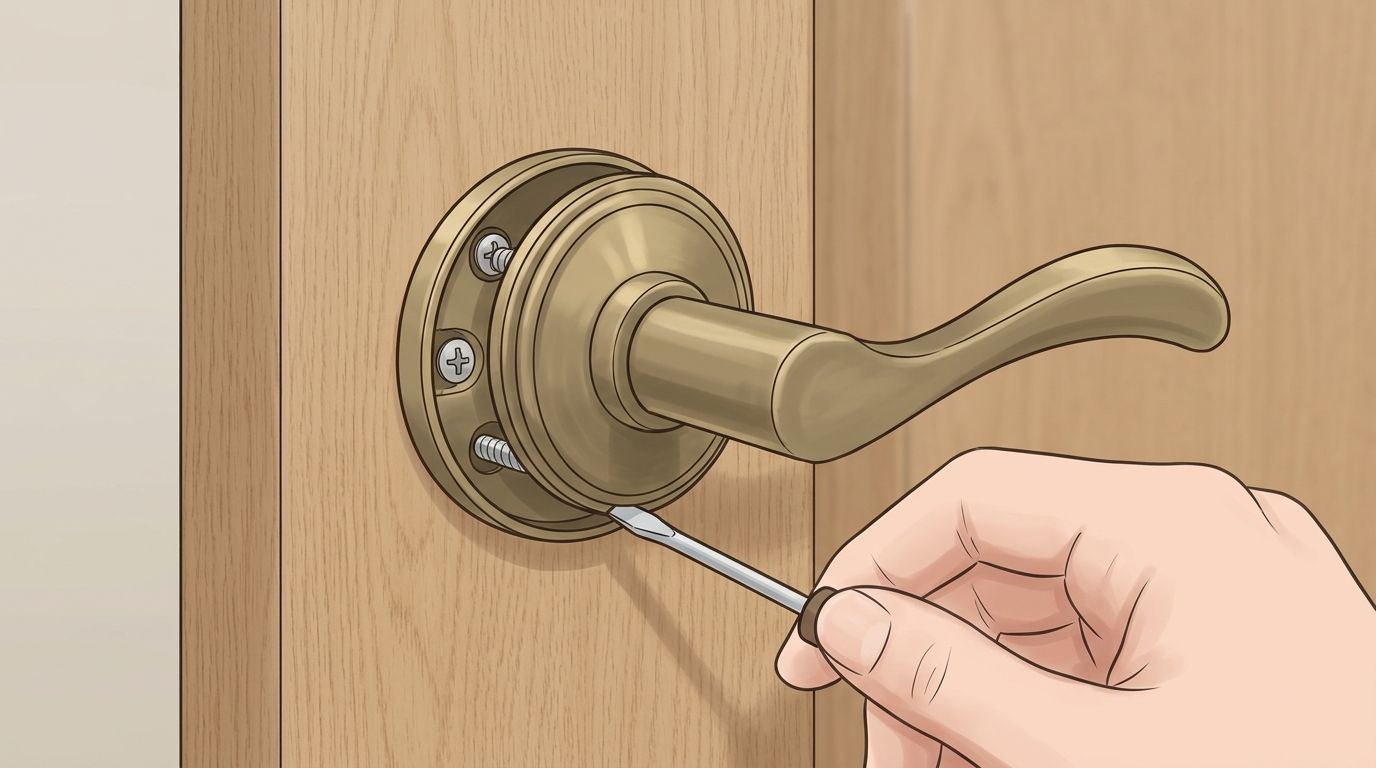
Expose the fasteners without damaging the finish
Look for a narrow notch on the underside of the rose or a seam between the decorative plate and mounting plate. Use a thin plastic pry tool or a protected flat screwdriver, applying gentle pressure away from the finished surface. If the handle has a detent release, use that instead of forcing the trim.
Once exposed, check the through-screws and mounting plate. Tighten opposite screws evenly in small increments rather than fully tightening one side first. Uneven pressure can twist the carrier and make the latch bind, even when the handle feels firmly attached.
The reliable rhythm is snug, test, repeat. Every tightening pass should be followed by several handle movements and a check that the latch fully retracts and returns.
If the screws turn without biting, the timber holes may be worn. A small hole repair can involve filling the damaged opening with suitable wood filler or timber slivers, allowing it to dry fully, then drilling a fresh pilot hole. Depending on the hardware and door construction, a longer compatible screw or suitable anchor may also restore a secure bite. Don't drive a larger screw through the decorative plate, because the head may not seat correctly or may crack the fitting.
Confirm spindle engagement and set-screw bite
Before reinstalling the rose, make sure the spindle sits fully in the handle hub and passes through the latch correctly. Tighten the set screw against the spindle's flat where one is provided. A set screw that contacts a rounded corner or misses the spindle entirely won't hold for long.
Precision matters here. A service procedure for door-handle assembly specifies final fastener torque of 9 N·m and calls for an alignment tool during assembly, as shown in this door-handle service procedure. Your residential handle may not use that exact specification, so don't apply it blindly. The useful lesson is that alignment and even tightening affect mechanical travel.
Stop if the lever becomes stiff after tightening. Back off slightly, reseat the mounting plate, and retighten in alternating passes. A wobble-free handle that doesn't spring back smoothly isn't repaired. It's over-constrained.
Fixing a Stuck Latch and Misaligned Strike Plate
A door that needs a slam in Kyle or Buda may have a perfectly serviceable handle. The latch could be meeting the strike too high, too low, or too far toward the hinge side. Seasonal swelling and movement can make the problem more noticeable in Driftwood and Dripping Springs, where exterior doors face persistent heat and changing moisture conditions.
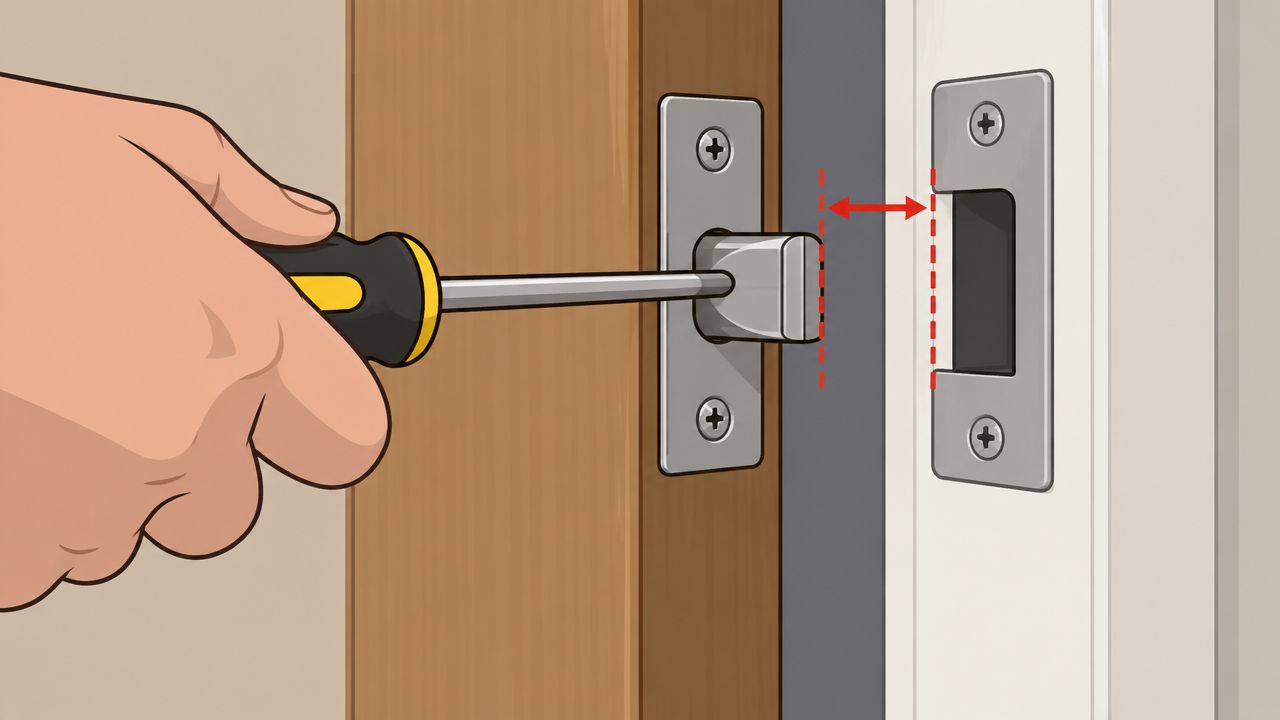
Find the contact point
Apply a small mark of lipstick, painter's tape, or another removable transfer material to the latch face. Close the door gently, then open it and inspect the strike. The mark shows where the latch is contacting instead of entering the opening cleanly.
If the latch misses by about 1/8 inch or less, careful filing of the strike plate can correct the contact, according to door-handle repair guidance. Remove only enough metal to create a clean path. Filing a large amount from the opening weakens the fit and can leave the latch catching only at its edge.
A larger offset usually calls for repositioning the strike plate. Remove it, mark the corrected position, drill suitable pilot holes, and refit it securely. Fill abandoned holes if the new screws won't get solid wood engagement.
Check the hinges before changing the strike
A sagging door can create a strike problem that returns after every adjustment. With the door open, check whether the hinge screws are loose or spinning in enlarged holes. Tighten them carefully, and use appropriate longer screws only when the hinge and frame construction can accept them without damaging wiring, glass, or surrounding trim.
Lubricate the latch with graphite or silicone-based lubricant. Work the handle repeatedly to distribute it, then wipe away excess. Oil-based lubricants attract dirt and can increase drag inside the latch, so they're a poor shortcut for an exterior entry.
Before reinstalling covers, verify full latch extension and full retraction with the door open. Then close the door with light pressure and test the handle from both sides. The latch should enter the strike without grinding, forcing, or slamming. If it still binds, the door may have movement or frame issues that a handle adjustment alone won't solve.
When Repair Makes Sense and When to Replace Hardware
Repair makes sense when the carrier, spindle, spring, and latch remain sound and the fault is limited to loose fasteners, worn screw holes, or modest alignment. Replacement becomes more sensible when the lever stays loose after tightening, the spring no longer returns it, the spindle is rounded, or the latch has repeated failures.
Typical pricing helps frame the decision. Repair-cost references place average door-handle repair around $50–$100, while replacement is commonly around $75–$175, according to the consumer door-fittings repair guide. Those are broad ranges, not a quote for every Austin home. Decorative entry sets, unusual finishes, labor access, and matching components can change the practical comparison.
Repair or Replace Decision Guide
| Symptom | Likely Cause | Best Action | Typical Cost Range |
|---|---|---|---|
| Handle wobbles at the base | Loose fasteners or mounting plate | Tighten evenly and inspect the plate | $50–$100 for repair |
| Screws keep turning | Worn screw holes | Repair holes and refit, or replace damaged mounting parts | $50–$100 for repair |
| Handle spins without catching | Rounded, short, or misfitting spindle | Replace the spindle if the handle remains serviceable | $50–$100 for repair |
| Lever stays down | Worn spring cassette or internal mechanism | Replace the mechanism or handleset | $75–$175 for replacement |
| Latch repeatedly misses | Strike or hinge alignment problem | Adjust alignment before replacing hardware | $50–$100 for repair |
| Premium set has broken internal parts | Limited repairability or unavailable components | Compare matched replacement with reconditioning | $75–$175 for replacement |
A decorative set in Steiner Ranch, Bee Cave, or Hutto may justify reconditioning when the finish, proportions, and exterior escutcheon are important to the entry design. It may not justify repeated labor when replacement parts aren't available or the internal carrier is cracked. Higher-end handlesets have historically commanded more spend, with a reported median price of $129 and a significant share of buyers paying at least $200, according to decorative door-hardware market coverage.
Finish matching matters during replacement. If the door itself is sun-faded or weathered, a new handle can make the surrounding finish look more tired. For coordinated entry work, front door refinishing in Austin can be considered alongside hardware replacement, especially for wood doors exposed to Central Texas sun and moisture.
Keep Your Entry Hardware Working Longer in Central Texas
A small maintenance routine prevents many emergency handle failures. Check the rose, backplate, escutcheon, set screw, and visible latch movement during a monthly visual inspection. For busy commercial-style entries or heavily used household doors, schedule professional service at least semi-annually, a practice consistent with the broader door-hardware maintenance guidance from facilities-management professionals.
Austin's average relative humidity is reported at about 67%, with morning humidity around 84% and afternoon humidity around 49%, according to Austin humidity averages. Another Austin climate record reports annual average humidity near 63%. Those daily and seasonal swings can affect exterior wood finishes, adhesives, and the fit around a door assembly, so keep water from pooling at the threshold and address finish failure before exposed wood begins moving.
Snug, test, repeat beats force, guess, and repeat.
Before calling the job finished, confirm:
- Handle movement: The lever or knob feels secure and returns smoothly.
- Latch travel: The latch retracts completely and extends fully.
- Strike contact: The door closes without a slam or shoulder pressure.
- Fastener security: Screws and set screws bite correctly without crushing trim.
- Finish condition: The entry coating protects the wood from moisture and UV exposure.
For finish-specific maintenance, see this guide to protecting wood finishes in Texas humidity. If the hardware repair exposes a larger finish problem, coordinate the entry work instead of installing new hardware over failing wood.
Restore My Kitchen ATX offers front door refinishing for sun-faded and weathered entry doors, along with coordinated finish updates that can complement repaired or replacement hardware. Visit Restore My Kitchen ATX to discuss your Austin metro entry project and request a project-specific consultation.